Change the Selection and Try Again Final Cut Pro
When working with loftier-resolution video (like UHD and higher) or when your computer struggles to provide sufficiently high processing speed, video editing tin can become a tedious and extensively long process. Add heavy furnishings to this mix and Final Cut's playback and preview update will become fifty-fifty slower.
These abnormalities don't happen all the fourth dimension but are usually triggered by certain activities. Here are some examples:
The good news is at that place are means of making video editing less annoying and more enjoyable for yous. Let'south the story begin!
Things e'er work better if you become the master settings right from the beginning. Every time you first working on a new projection that needs denoising, information technology is worth making sure that Neat Video is set to use optimal hardware parameters. That volition allow the denoiser to achieve the best functioning.
In FCP Ten'southward Inspector panel, become to Keen Video'southward Options window, then to the menuTools > Preferences > Functioning > Optimize Settings… and click Start. When the test is complete and you come across the best speed Cracking Video tin can accomplish on your computer (please keep in mind that the number of the FPS in this test shows the maximum speed that Corking Video can achieve without the overhead of Terminal Cut and other furnishings using the same resource), click the Take Best Combination push.
Also check the GPU memory usage reported in Preferences > Operation folio. Allowing Neat Video to use too much GPU memory may cause the denoiser and other GPU users (including Last Cut) to hinder each other, which will pb to some actress slowdown. On the other manus, giving Neat Video too niggling GPU retentivity will make the filter itself slower. Try experimenting with the slider and encounter what value gives you meliorate issue. The 'Bank check speed' button is helpful for a quick speed estimation. If you need a more than accurate measurement (for instance, earlier starting a several hours render), you can too measure the time needed to fully process a short projection with Neat Video in Final Cutting and adjust settings accordingly.
If you are on macOS 10.15 or newer, y'all tin can likewise check if using Metal instead of OpenCL offers better performance. You lot can switch the mode in the Preferences > Performance > Advanced Settings dialog.
Turn Off Background Render
Rendering is the process of creating temporary video and sound render files for segments of your project that Final Cut Pro tin can't play in real-time. When you edit in your timeline and yous add a clip that uses a different codec that you're editing in, or you add a color adjustment, keyframe an image, add lower 3rd and other items that require rendering for playback in high quality, the render indicator (a light greyness dotted line) appears below the ruler at the peak of the timeline. That means the reckoner may demand to procedure that section of your video earlier you tin can play it back smoothly.
By default, rendering in Final Cut begins in the background 0.iii seconds after you stop working and moving the mouse arrow.
The problem with the background render is it tin can accept the king of beasts's share of all estimator resource. If yous work on a not very powerful estimator or with big-resolution video, you won't be able to do anything else until the process is consummate. Even the latest MacBook Pro gets very sluggish when doing groundwork render of a 4K clip.
Rather than allowing Final Cutting to start rendering things automatically, nosotros suggest taking control into your ain hands. Starting time rendering certain parts of the timeline only when you demand them to be rendered. Don't waste your time waiting when you lot accept to work on the edit.
To turn the background rendering off go to Final Cut'due south Preferences and plough off the Background render pick.
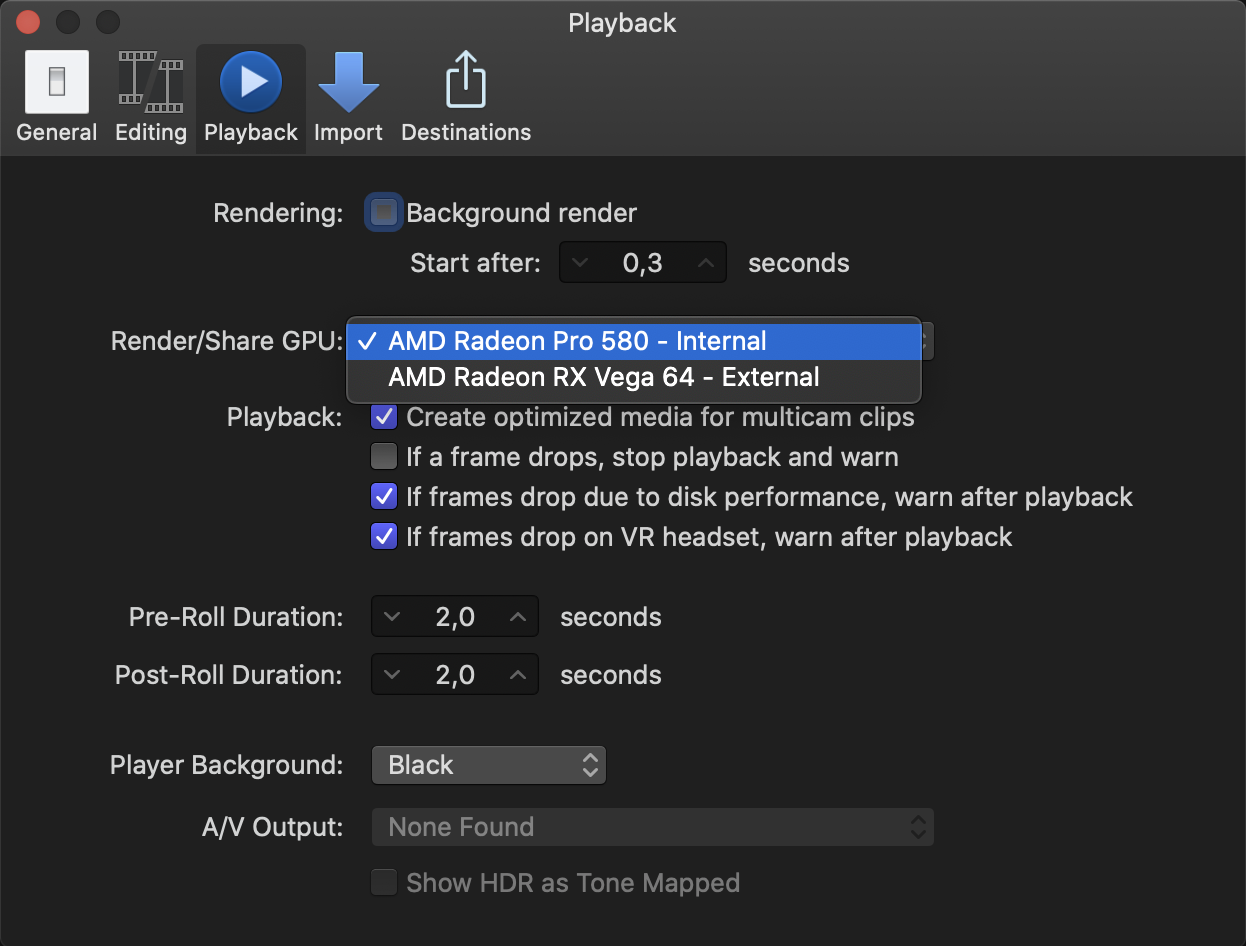
Split Multiple GPUs
If you take two GPUs, their resource can be divided between Final Cutting itself and effects such every bit Neat Video. This can be accomplished by going to Concluding Cut'south Preferences > Playback > Render/Share GPU and selecting the GPU to be used by Final Cut from the drop-downwards carte. The other carte du jour volition exist left bachelor for the needs of 3rd party effects and other GPU users. Such separation can better Terminal Cut'southward performance and make playback smoother.
Equally you can divide the GPUs differently between Final Cut and Neat Video, y'all may want to run some speed tests with different combinations of the Render/Share GPU selection in Final Cut'due south playback settings and GPU(s) selected in Great Video Preferences. The fastest combination will depend on your hardware and project.
Ready to picket? Render. Play
When you lot want to check your last touches to encounter how they complement the whole clip, it's time to play information technology back. Having groundwork playback switched off to permit Last Cut to be more responsive means you lot demand to start the return procedure yourself.
To render a portion of your project select the prune or clips that yous want to return in the timeline, then cull Modify > Render Selection (or press Command-R).
If you desire to render all portions of your project, and then get to Change > Render All (or press Command-Shift-R).
Once the render is done, you tin play that selected clip (clips) at full speed in Final Cutting's preview.
Turn off Skimming
Skimming is another option that tin can suck out a pregnant chunk of your computer resources. When you piece of work with large frames and have both skimming and background return enabled, Final Cut can get extremely ho-hum. The wait for each frame to be displayed can easily get to several seconds.
On the other hand, skimming is an extremely useful feature of Final Cut. It tin salve you a ton of time if y'all are working on a massive project with multi-cam editing.
And so if yous see that your computer is choking, try turning off both normal (timeline) Skimming and Prune Skimming. You can command normal skimming with the Due south-key or go to View > Skimming. Clip Skimming can be switched off with Selection+Control+S combination or View > Clip Skimming .
Define Required Resolution and Stick with It
These days almost whatever modernistic telephone can shoot 4K clips, not to mention professional cameras and their capabilities. Withal, yous do not e'er need to produce the terminal video in the same high resolution. For instance, large frame formats are not often used in online video platforms. Loftier-res video typically gets heavily transformed by the platform's video codecs and sometimes gets downsized. It may exist sufficient in some cases to upload a lower-resolution version.
At times, you may also need to downsize a clip in the edit, for example, when you lot bring a larger clip to a smaller-resolution project or when you lot need to crop a part of the larger frame.
If done correctly, the size reduction can help to speed up the render process because applying Neat Video dissonance reduction to smaller frames is always faster than to larger frames.
In Final Cut, yous can control the size of the frames coming to the project using a Compound clip. For example if y'all need to bring a 4K clip into a FullHD projection:
- Open/create a FullHD project.
- Select the original 4K clip and create a compound clip from information technology: employ the menu File > New > Chemical compound Clip ( or keys "Option + G ").
- In the popular-up settings window, select Custom in Video Properties and choose 1080p Hd Format and 1920x1080 resolution (or different settings depending on your needs).
- Put the compound prune into the timeline of the FullHD project. Utilize Neat Video to the chemical compound clip in the timeline. Then Neat Video volition receive FullHD frames for profiling and rendering and will work faster than it would with the original 4K clip.
Disable Heavy Effects
Another option to avoid a slowdown in Final Cutting is to disable the instances of heavy furnishings or filters (Neat Video's Reduce Noise v5 is one of them) after adding and setting them up in your clip. You can just disable each instance of an effect using Terminal Cut's controls and such a disabled event volition not influence the operation while you continue editing. At that place is only one important matter to remember though: you have to re-enable each such disabled event before the final render/consign of your project.
Create Optimized or Proxy Media
Final Cut Pro tin can play dorsum many media formats, simply it doesn't mean all of them are suitable for editing. RAW files encoded with "ho-hum" codecs can brand editing and rendering very sluggish. To avoid that Final Cut offers transcoding to the Apple ProRes 422 format. Using optimized media will permit you to edit faster. The only downside of this option is the relatively large size of the optimized media files that may require some space on your difficult drive.
If yous have originally large frames and the final product also has to have the same high resolution, then using proxy media can come up in handy. When Final Cutting creates proxy files they are encoded with Apple ProRes 422 Proxy format and unremarkably are only one/iv of the size of the original file. That allows to reduce and even avoid sluggish playback and dropped frames.
At that place are two places where you can transcode media and create proxy files:
- During import
Create optimized media or Create proxy media or both - In the Browser
Correct-click the media file in the Browser, select Transcode Media… > Create optimized media or Create proxy media or both > Ok.
(Notation: If the original camera format tin be edited with good performance, the Create optimized media option is dimmed)
All transcoding happens in the groundwork. When the procedure is consummate, Final Cut automatically switches from photographic camera native to optimized files.
When using proxy media, don't forget to switch dorsum to the original files before the terminal render or consign. Unfortunately, Last Cut doesn't practice that automatically.
Use High Quality Simply When Necessary
Neat Video has the Quality Manner: High settings in the Temporal and Spatial filters. Those quality modes can help y'all become better denoising results (like preserving more details, reducing more noise) in some cases. These options require longer processing and then if y'all are not sure there is a significant comeback from using that, then leave the Quality Way at Normal and save processing fourth dimension and resources for something else.
Source: https://blog.neatvideo.com/post/fc-smooth-play
Post a Comment for "Change the Selection and Try Again Final Cut Pro"